Unity 3D Shader
Stylized Water Shader
Stylized Water Shader

Overview
Overview
This shader was made in Unity and using Universal Render Pipeline, almost entirely on Shader Graph with a glimpse of HLSL. It includes color variation depending on depth, foam on surfaces intersections, vertex displacement to simulate waves and water distortion on submerged surfaces.
The system is built around Depth Fade, which samples depth difference between the shader mesh and what is rendered behind to generate a gradient used for both the color and the foam amount.
This shader features a lot of modularity, being able to manipulate the colors, foam cutoff values and the noise parammeters on foam, vertex displacement and water distortion.
This shader is well-suited for toon-stylized games with unlit elements or custom lighting shaders, such as toon shaders.
This shader was made in Unity and using Universal Render Pipeline, almost entirely on Shader Graph with a glimpse of HLSL. It includes color variation depending on depth, foam on surfaces intersections, vertex displacement to simulate waves and water distortion on submerged surfaces.
The system is built around Depth Fade, which samples depth difference between the shader mesh and what is rendered behind to generate a gradient used for both the color and the foam amount.
This shader features a lot of modularity, being able to manipulate the colors, foam cutoff values and the noise parammeters on foam, vertex displacement and water distortion.
This shader is well-suited for toon-stylized games with unlit elements or custom lighting shaders, such as toon shaders.
This shader was made in Unity and using Universal Render Pipeline, almost entirely on Shader Graph with a glimpse of HLSL. It includes color variation depending on depth, foam on surfaces intersections, vertex displacement to simulate waves and water distortion on submerged surfaces.
The system is built around Depth Fade, which samples depth difference between the shader mesh and what is rendered behind to generate a gradient used for both the color and the foam amount.
This shader features a lot of modularity, being able to manipulate the colors, foam cutoff values and the noise parammeters on foam, vertex displacement and water distortion.
This shader is well suited for toon stylized games with unlit elements or custom lighting shaders, such as toon shaders.
Depth Fade
Depth Fade
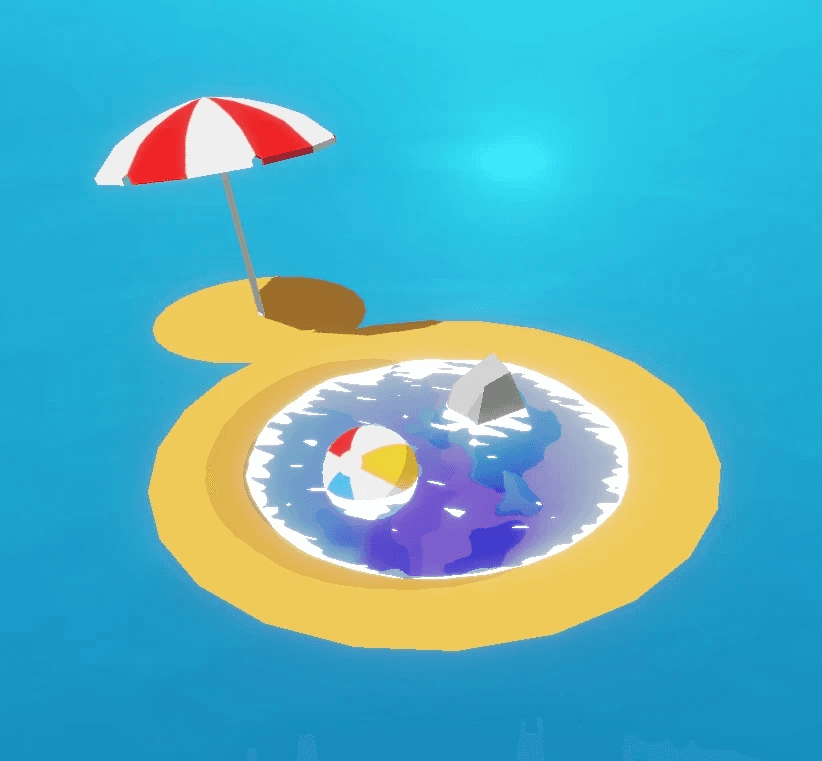
To better test the shader, we initially created two simple meshes: a pond mesh to demonstrate how the shader behaves along shorelines, and a sphere mesh to showcase how the shader reacts around edges and intersections. Both meshes use unlit materials to keep the focus entirely on the shader itself.
As our first step, we define the Depth Fade effect, which consists of sampling the scene depth relative to the shaded mesh from the camera’s perspective. This generates a gradient that becomes softer near intersections and more intense in deeper areas. A Depth Maximum Distance parameter can be used to control how the Depth Fade gradient is distributed, reaching its maximum intensity once the sampled depth equals this value.
This Depth Fade gradient can then be used to lerp between a shallow color and a deep color. By setting the shader to transparent and using the alpha values of these colors as the shader alpha, we already obtain a visual base for the shader.
To better test the shader, we initially created two simple meshes: a pond mesh to demonstrate how the shader behaves along shorelines, and a sphere mesh to showcase how the shader reacts around edges and intersections. Both meshes use unlit materials to keep the focus entirely on the shader itself.
As our first step, we define the Depth Fade effect, which consists of sampling the scene depth relative to the shaded mesh from the camera’s perspective. This generates a gradient that becomes softer near intersections and more intense in deeper areas. A Depth Maximum Distance parameter can be used to control how the Depth Fade gradient is distributed, reaching its maximum intensity once the sampled depth equals this value.
This Depth Fade gradient can then be used to lerp between a shallow color and a deep color. By setting the shader to transparent and using the alpha values of these colors as the shader alpha, we already obtain a visual base for the shader.

Depth Foam
Depth Foam
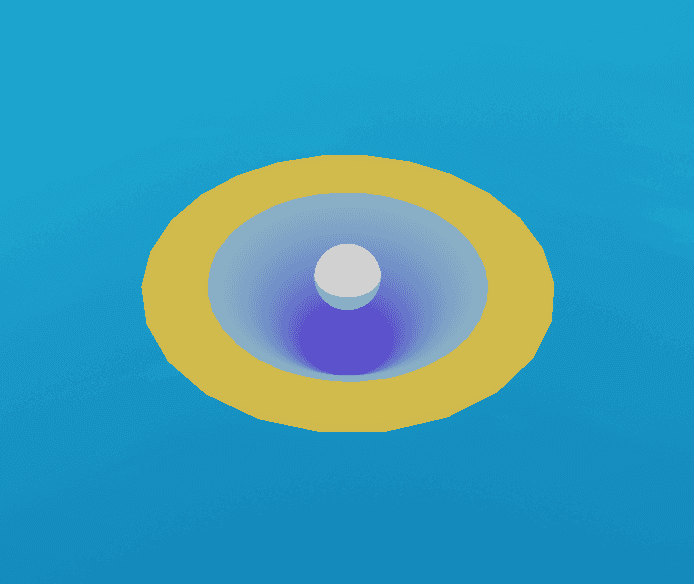
To begin creating the foam effect, we first define a base Gradient Noise texture and multiply with the desired foam color, then blend this noise with the base color. It is important to use the XZ coordinates of the World Space position as the noise UVs, to ensure tiling across multiple meshes using the shader.
Next, the Depth Fade gradient is combined with a Depth Foam Cutoff parameter to threshold the noise and generate the shoreline foam. A scrolling effect is then added by offsetting the noise coordinates over time using a Time node and a Scrolling Amount parameter.
To introduce additional variation, a second Gradient Noise layer with a different tiling and scale can be blended in, producing a more organic and randomized foam pattern.
To begin creating the foam effect, we first define a base Gradient Noise texture and multiply with the desired foam color, then blend this noise with the base color. It is important to use the XZ coordinates of the World Space position as the noise UVs, to ensure tiling across multiple meshes using the shader.
Next, the Depth Fade gradient is combined with a Depth Foam Cutoff parameter to threshold the noise and generate the shoreline foam. A scrolling effect is then added by offsetting the noise coordinates over time using a Time node and a Scrolling Amount parameter.
To introduce additional variation, a second Gradient Noise layer with a different tiling and scale can be blended in, producing a more organic and randomized foam pattern.


Depth Foam Normals Amplification
Depth Foam Normals Amplification
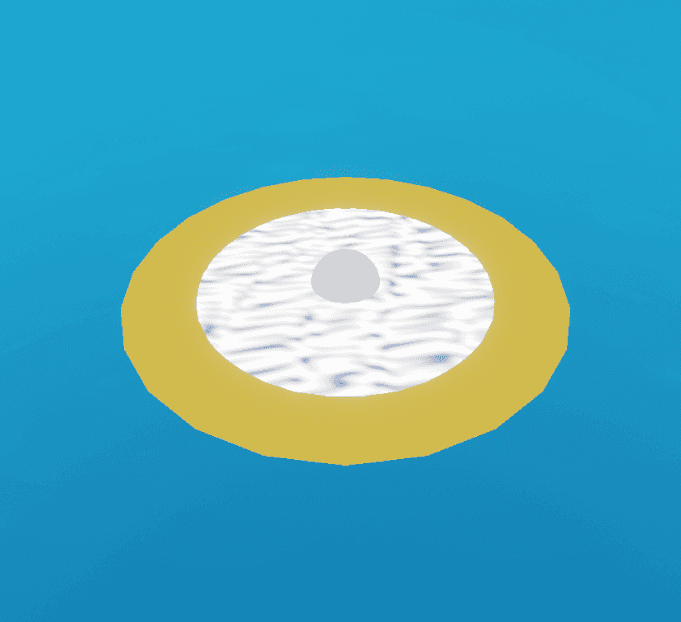
If we rely only on the Depth Fade gradient, the shader will not behave correctly when viewing edges from steep angles. In these situations, the foam tends to disappear because the depth difference becomes too small. To compensate for this, the Depth Foam Cutoff value must be reduced in regions containing sharp edges, in other words, areas where the shaded mesh normals differ significantly from the normals of the objects behind it.
To achieve this, we sample the View Space Screen Normals using a small HLSL file in a Custom Function Node, then compare them against the View Space Mesh Normals using a dot product operation and apply a One Minus node with the result. This generates a mask highlighting regions where the surface orientation changes abruptly.
Using this mask, we can reduce the Depth Foam Cutoff by a Depth Foam Normals Amplification factor, causing the cutoff reduction to become lower in areas where the mask intensity is higher. This allows the foam to remain visible around edges and steep viewing angles.
If we rely only on the Depth Fade gradient, the shader will not behave correctly when viewing edges from steep angles. In these situations, the foam tends to disappear because the depth difference becomes too small. To compensate for this, the Depth Foam Cutoff value must be reduced in regions containing sharp edges, in other words, areas where the shaded mesh normals differ significantly from the normals of the objects behind it.
To achieve this, we sample the View Space Screen Normals using a small HLSL file in a Custom Function Node, then compare them against the View Space Mesh Normals using a dot product operation and apply a One Minus node with the result. This generates a mask highlighting regions where the surface orientation changes abruptly.
Using this mask, we can reduce the Depth Foam Cutoff by a Depth Foam Normals Amplification factor, causing the cutoff reduction to become lower in areas where the mask intensity is higher. This allows the foam to remain visible around edges and steep viewing angles.


Ripple Foam
Ripple Foam
To generate ripple foam uniformly across the shader surface, we can reuse the same noise pattern already used for the Depth Foam and directly threshold it using a Ripple Foam Cutoff parameter.
This Ripple Foam is then added to the Depth Foam to produce the final foam result. Reusing the same noise for both noise effects helps maintaining consistency across the surface, integrating both foam patterns naturally.
To generate ripple foam uniformly across the shader surface, we can reuse the same noise pattern already used for the Depth Foam and directly threshold it using a Ripple Foam Cutoff parameter.
This Ripple Foam is then added to the Depth Foam to produce the final foam result. Reusing the same noise for both noise effects helps maintaining consistency across the surface, integrating both foam patterns naturally.

Vertex Displacement Waves
Vertex Displacement Waves
We can generate waves on the mesh by sampling a Gradient Noise pattern and using it to displace the vertices of the shaded mesh in their normal direction. For this effect to appear smooth and natural, it is crucial that the mesh contains enough subdivisions for this vertex displacement effect.
Similarly to the Foam Noise setup, sampling the Gradient Noise using the XZ coordinates of the World Space Position as UVs ensures tiling across multiple meshes using the shader.
We can generate waves on the mesh by sampling a Gradient Noise pattern and using it to displace the vertices of the shaded mesh in their normal direction. For this effect to appear smooth and natural, it is crucial that the mesh contains enough subdivisions for this vertex displacement effect.
Similarly to the Foam Noise setup, sampling the Gradient Noise using the XZ coordinates of the World Space Position as UVs ensures tiling across multiple meshes using the shader.
Screen Space Distortion
Screen Space Distortion
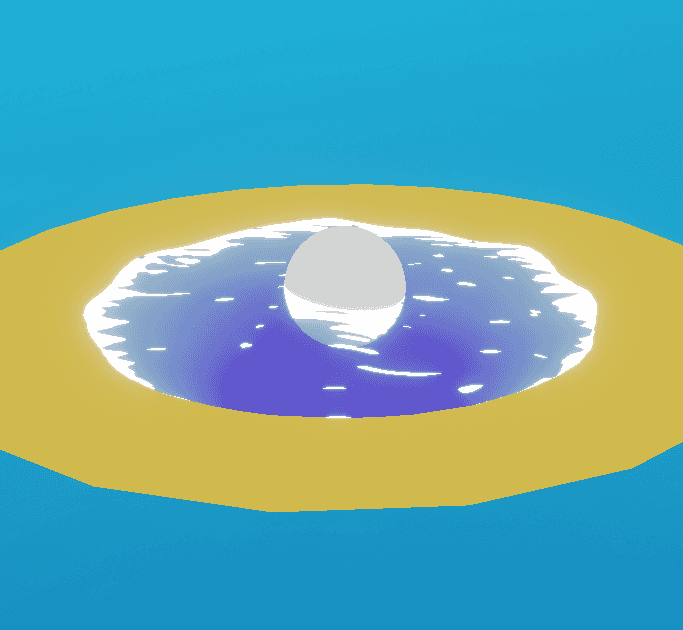
To create the water distortion effect on submerged objects, we need to sample the Scene Color, apply a distortion to it, and then render the result through the shader. Because of this approach, the shader should remain fully opaque in terms of alpha output, while transparency is simulated by blending the water color with the distorted screen color. In theory, the shader could be rendered as opaque, but it must remain in the Transparent Render Queue for a correct depth sampling.
The distortion is generated using a Gradient Noise, which is added to the Screen Position node. These distorted coordinates are then used to sample both the Scene Color and the Depth Fade effect. The distorted scene color is blended with the water's base color using the base color alpha, creating a simulated transparency.
It is important to configure the Camera Opaque Texture downsampling setting in the URP Asset, as it directly affects the quality of the distortion. The effect achieves its highest quality when the Camera Opaque Texture is not downsampled, although this increases performance cost.
Once the distortion effect is in place, a Boolean Keyword can be added to enable or disable it. This optimization prevents the shader from compiling and executing the Scene Color sampling path when distortion is not required, reducing the cost of this expensive operation.
To create the water distortion effect on submerged objects, we need to sample the Scene Color, apply a distortion to it, and then render the result through the shader. Because of this approach, the shader should remain fully opaque in terms of alpha output, while transparency is simulated by blending the water color with the distorted screen color. In theory, the shader could be rendered as opaque, but it must remain in the Transparent Render Queue for a correct depth sampling.
The distortion is generated using a Gradient Noise, which is added to the Screen Position node. These distorted coordinates are then used to sample both the Scene Color and the Depth Fade effect. The distorted scene color is blended with the water's base color using the base color alpha, creating a simulated transparency.
It is important to configure the Camera Opaque Texture downsampling setting in the URP Asset, as it directly affects the quality of the distortion. The effect achieves its highest quality when the Camera Opaque Texture is not downsampled, although this increases performance cost.
Once the distortion effect is in place, a Boolean Keyword can be added to enable or disable it. This optimization prevents the shader from compiling and executing the Scene Color sampling path when distortion is not required, reducing the cost of this expensive operation.


Final Demo Scene & Recommendations
Final Demo Scene & Recommendations
Now that the shader is complete, we can build a small demo scene to showcase the Stylized Water Shader in action, combining it with additional environment assets and a Simple Toon Shader to create a cohesive visual presentation.
This shader is particularly well suited for stylized and toon based games, as it shades the same art direction and integrates well with cel shaded objects.
When using the shader, it is important to be mindful of the water distortion feature. Sampling the Scene Color is the most expensive operation performed by the shader, and its cost increases further when the Camera Opaque Texture is rendered at full resolution. For performance sensitive projects, consider disabling distortion where it is not essential or using a downsampled Camera Opaque Texture when possible.
Now that the shader is complete, we can build a small demo scene to showcase the Stylized Water Shader in action, combining it with additional environment assets and a Simple Toon Shader to create a cohesive visual presentation.
This shader is particularly well suited for stylized and toon based games, as it shades the same art direction and integrates well with cel shaded objects.
When using the shader, it is important to be mindful of the water distortion feature. Sampling the Scene Color is the most expensive operation performed by the shader, and its cost increases further when the Camera Opaque Texture is rendered at full resolution. For performance sensitive projects, consider disabling distortion where it is not essential or using a downsampled Camera Opaque Texture when possible.

